
About this project
In an earlier project I developed a self-balancing robot.
The robot could be controlled by a joystick. In this project the robot is controlled by gestures. The gestures are recognized by a neural network. The neural network is based on TensorFlow Lite.
TensorFlow Lite is TensorFlow’s lightweight solution for mobile and embedded devices. It lets you run machine-learned models on mobile devices like Arduino.
My sketch was implemented on a Arduino Nano BLE Sense. The board has a built-in nine-axis IMU. This sensor module contains a 3-axis gyroscope, a 3-axis accelerometer, and a 3-axis magnetic sensor.
For training with TensorFlow, the desired gestures are first recorded with the gyroscope and the accelerometer (Sketch IMU_Capture.ino). Afterwards the training takes place with the data on the PC in Jupyter Notebook or in GoogleColab with Python. GoogleColab provides a Jupyter notebook that allows us to run our machine learning model in a web browser. After the training of the network, the model will be Convert to TensorFlow Lite. To use a model with TensorFlow Lite, you must convert a full TensorFlow model into the TensorFlow Lite format.
In the end, the converted model is copied into the Arduino header file of the sketch IMU_Classifier.ino.
The necessary steps are explained very well in the TinyML articles from Sandeep Mistry and Don Coleman.
- Exercise 1: Development Environment
- Exercise 2: Assemble the Hardware
- Exercise 3: Visualizing the IMU Data
- Exercise 4: Gather the Training Data
- Exercise 5: Machine Learning
- Exercise 6: Classifying IMU Data
- Exercise 7: Gesture Controlled USB Emoji Keyboard
- Exercise 8: Next Steps
Templates for the sketches are in GitHub:
- ArduinoSketches/IMU_Capture/IMU_Capture.ino
- ArduinoSketches/IMU_Classifier/IMU_Classifier.ino
I’ve modified these sketches for my purposes.
The Sketch IMU_Classifier.ino uses the on-board IMU to start reading acceleration and gyroscope data from on-board IMU, once enough samples are read, it then uses a TensorFlow Lite (Micro) model to try to classify the movement as a known gesture. After a gesture is recognized, the X and Y coordinates are sent to the self balancing robot. Unfortunately I could not use Bluetooth BLE from Arduino Nano, because this is not compatible to the HC-05 Modul on my DUE Board with the self balancingrobot. That’s why I used a HC-05 Bluetooth modul.
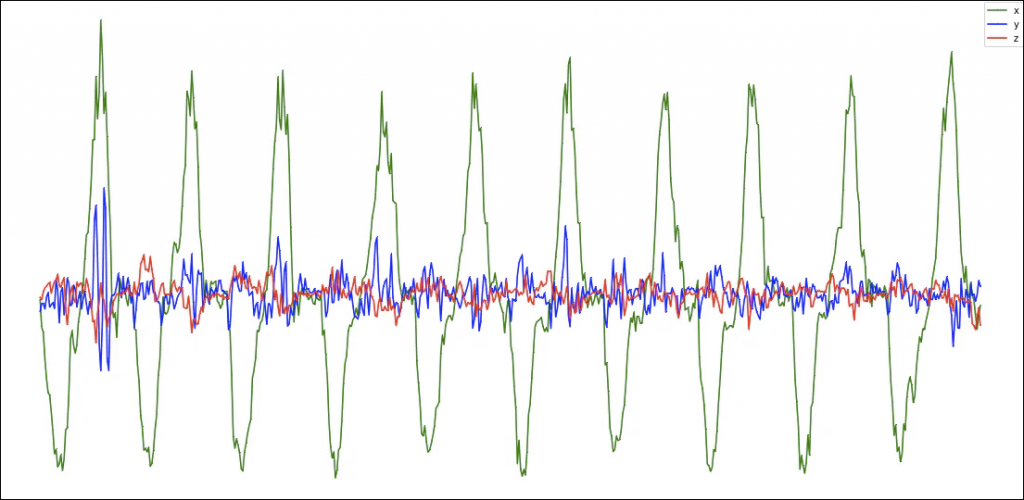
In the following examples shows the Caputre of gestures.
Graph index 0 for file’forward‘ Acceleration
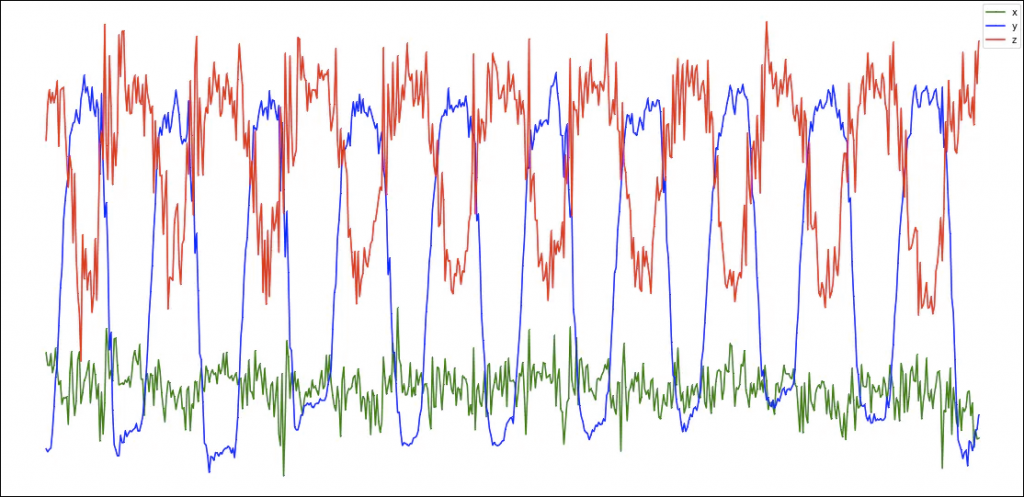
Graph index 0 for file’forward’Gyroscope
Code for Arduino in C++
/*
  IMU Capture

  This example uses the on-board IMU to start reading acceleration and gyroscope
  data from on-board IMU and prints it to the Serial Monitor for one second
  when the button is pressed.

  You can also use the Serial Plotter to graph the data.

  The circuit:
  - Arduino Nano 33 BLE or Arduino Nano 33 BLE Sense board.
  - Button connected to pin 3 and GND.

  Created by Don Coleman, Sandeep Mistry

  modified by Rolf Kurth

  This example code is in the public domain.
*/

#include <Arduino_LSM9DS1.h>

const int buttonPin = 3;     // the number of the pushbutton pin
const int numSamples = 59;
//const int numSamples = 119;

int previousButtonState = HIGH;
int samplesRead = numSamples;

void setup() {
  Serial.begin(115200);
  while (!Serial);

  // initialize the pushbutton pin as an input with (internal) pullup:
  pinMode(buttonPin, INPUT_PULLUP);

  if (!IMU.begin()) {
    Serial.println("Failed to initialize IMU!");
    while (1);
  }
  Serial.print("Gyroscope sample rate in degrees/second = ");
  Serial.print(IMU.gyroscopeSampleRate());
  Serial.println(" Hz");
  Serial.println();

  Serial.print("Accelerometer sample rate in G's = ");
  Serial.print(IMU.accelerationSampleRate());
  Serial.println(" Hz");
  Serial.println();

  // print the header
  Serial.println("aX,aY,aZ,gX,gY,gZ");
}

void loop() {
  // read the state of the push button pin:
  int buttonState = digitalRead(buttonPin);
  // Serial.println(buttonState);
  // compare the button state to the previous state
  // to see if it has changed
  if (buttonState != previousButtonState) {
    if (buttonState == LOW) {
      if (samplesRead == numSamples) {
        // pressed
        samplesRead = 0;
      }
    } else {
      // released
    }

    // store the state as the previous state, for the next loop
    previousButtonState = buttonState;
  }

  // check if the all the required samples have been read since
  // the last time the button has been pressed
  if (samplesRead < numSamples) {
    // check if both new acceleration and gyroscope data is
    // available
    if (IMU.accelerationAvailable() && IMU.gyroscopeAvailable()) {
      float aX, aY, aZ, gX, gY, gZ;

      // read the acceleration and gyroscope data
      IMU.readAcceleration(aX, aY, aZ);
      IMU.readGyroscope(gX, gY, gZ);

      samplesRead++;

      // print the data in CSV format
      Serial.print(aX, 3);
      Serial.print(',');
      Serial.print(aY, 3);
      Serial.print(',');
      Serial.print(aZ, 3);
      Serial.print(',');
      Serial.print(gX, 3);
      Serial.print(',');
      Serial.print(gY, 3);
      Serial.print(',');
      Serial.print(gZ, 3);
      Serial.println();

      if (samplesRead == numSamples) {
        // add an empty line if it's the last sample
        Serial.println();
      }
    }
  }
}

// in extra Tab*************************************************

#ifndef BTooth_h
#define  BTooth_h
#include "Arduino.h"


//********************************************************************** /
class BTooth
///**********************************************************************/
{
  public:

    BTooth(); // Constructor

    void XYsend(int x, int y);

};
#endif
// in extra Tab *************************************************

#include "BTooth.h"


/**********************************************************************/
BTooth::BTooth()
/**********************************************************************/
{}


void   BTooth::XYsend(int x, int y ) {
  int  Up, Down, Left , Right, JButton;
  Serial1.print("X");
  Serial1.print("#");  // delimiter
  Serial1.print(x);    // X value
  Serial1.print("#");
  Serial1.print("Y");  // Y value
  Serial1.print("#");
  Serial1.print(y);
  Serial1.print("#");
  Serial1.print("B1");  // the rest compatible to my old Joy Stick solution
  Serial1.print("#");
  Serial1.print(JButton);
  Serial1.print("#");
  Serial1.print("Up");
  Serial1.print("#");
  Serial1.print(Up);
  Serial1.print("#");
  Serial1.print("Do");
  Serial1.print("#");
  Serial1.print(Down);
  Serial1.print("#");
  Serial1.print("Le");
  Serial1.print("#");
  Serial1.print(Left);
  Serial1.print("#");
  Serial1.print("Ri");
  Serial1.print("#");
  Serial1.print(Right);
  Serial1.print("#");
  Serial1.print('\n');

}
/*
  IMU Classifier

  This example uses the on-board IMU to start reading acceleration and gyroscope
  data from on-board IMU, once enough samples are read, it then uses a
  TensorFlow Lite (Micro) model to try to classify the movement as a known gesture.

  Note: The direct use of C/C++ pointers, namespaces, and dynamic memory is generally
        discouraged in Arduino examples, and in the future the TensorFlowLite library
        might change to make the sketch simpler.

  The circuit:
  - Arduino Nano 33 BLE or Arduino Nano 33 BLE Sense board.
  - Button connected to pin 3 and GND.

  Created by Don Coleman, Sandeep Mistry
  modified by Rolf Kurth

  This example code is in the public domain.
*/

// ------------------------------------------------------------------------
//  https://www.arduino.cc/en/Reference/HomePage
// ------------------------------------------------------------------------

#include <Arduino_LSM9DS1.h>

#include <TensorFlowLite.h>
#include <tensorflow/lite/experimental/micro/kernels/all_ops_resolver.h>
#include <tensorflow/lite/experimental/micro/micro_error_reporter.h>
#include <tensorflow/lite/experimental/micro/micro_interpreter.h>
#include <tensorflow/lite/schema/schema_generated.h>
#include <tensorflow/lite/version.h>
#include "BTooth.h"
#
#include "model.h"


const int buttonPin = 3;     // the pin number of the pushbutton pin
const int numSamples = 59;

int previousButtonState = HIGH;
int samplesRead = numSamples;
#define TestRun

// global variables used for TensorFlow Lite (Micro)
tflite::MicroErrorReporter tflErrorReporter;

// pull in all the TFLM ops, you can remove this line and
// only pull in the TFLM ops you need, if would like to reduce
// the compiled size of the sketch.
tflite::ops::micro::AllOpsResolver tflOpsResolver;


const tflite::Model* tflModel = nullptr;
tflite::MicroInterpreter* tflInterpreter = nullptr;
TfLiteTensor* tflInputTensor = nullptr;
TfLiteTensor* tflOutputTensor = nullptr;

// Create a static memory buffer for TFLM, the size may need to
// be adjusted based on the model you are using
constexpr int tensorArenaSize = 8 * 1024;
byte tensorArena[tensorArenaSize];

// array to map gesture index to a name
const char* GESTURES[] = {
  "left",
  "right",
  "forward",
  "backward",
};
const int XDirection[] = { 30, -30, 0, 0 };
const int YDirection[] = { 0, 0, 30, -30 };

#define NUM_GESTURES (sizeof(GESTURES) / sizeof(GESTURES[0]))

BTooth BT;  // Bluetooth Sender

void setup() {
  Serial.begin(9600);
  Serial1.begin(9600);

  // initialize the pushbutton pin as an input with pullup:
  pinMode(buttonPin, INPUT_PULLUP);

  // initialize the IMU
  if (!IMU.begin()) {
    Serial.println("Failed to initialize IMU!");
    while (1);
  }

  // print out the samples rates of the IMUs
  Serial.print("Accelerometer sample rate = ");
  Serial.print(IMU.accelerationSampleRate());
  Serial.println(" Hz");
  Serial.print("Gyroscope sample rate = ");
  Serial.print(IMU.gyroscopeSampleRate());
  Serial.println(" Hz");

  Serial.println();

  // get the TFL representation of the model byte array
  tflModel = tflite::GetModel(model);
  if (tflModel->version() != TFLITE_SCHEMA_VERSION) {
    Serial.println("Model schema mismatch!");
    while (1);
  }

  // Create an interpreter to run the model
  tflInterpreter = new tflite::MicroInterpreter(tflModel, tflOpsResolver, tensorArena, tensorArenaSize, &tflErrorReporter);

  // Allocate memory for the model's input and output tensors
  tflInterpreter->AllocateTensors();

  // Get pointers for the model's input and output tensors
  tflInputTensor = tflInterpreter->input(0);
  tflOutputTensor = tflInterpreter->output(0);

  static bool is_initialized = false;
  if (!is_initialized) {
    pinMode(LED_BUILTIN, OUTPUT);
    // Pins for the built-in RGB LEDs on the Arduino Nano 33 BLE Sense
    pinMode(LEDR, OUTPUT);
    pinMode(LEDG, OUTPUT);
    pinMode(LEDB, OUTPUT);
    // Ensure the LED is off by default.
    // Note: The RGB LEDs on the Arduino Nano 33 BLE
    // Sense are on when the pin is LOW, off when HIGH.
    digitalWrite(LEDR, HIGH);
    digitalWrite(LEDG, HIGH);
    digitalWrite(LEDB, HIGH);
    is_initialized = true;

  }
}

void loop() {
  // read the state of the push button pin:
  int buttonState = digitalRead(buttonPin);

  // compare the button state to the previous state
  // to see if it has changed
  if (buttonState != previousButtonState) {
    if (buttonState == LOW) {
      if (samplesRead == numSamples) {
        // pressed       }
        samplesRead = 0;
        digitalWrite(LED_BUILTIN, LOW);
        digitalWrite(LEDR, HIGH);
        digitalWrite(LEDG, HIGH);
        //       digitalWrite(LEDB, HIGH);
      }
    } else {
      // released
      digitalWrite(LED_BUILTIN, HIGH);
      digitalWrite(LEDR, HIGH);
      digitalWrite(LEDG, HIGH);
    }

    // store the state as the previous state, for the next loop
    previousButtonState = buttonState;
  }

  // check if the all the required samples have been read since
  // the last time the button has been pressed
  if (samplesRead < numSamples) {
    // check if new acceleration AND gyroscope data is available
    if (IMU.accelerationAvailable() && IMU.gyroscopeAvailable()) {
      float aX, aY, aZ, gX, gY, gZ;

      // read the acceleration and gyroscope data
      IMU.readAcceleration(aX, aY, aZ);
      IMU.readGyroscope(gX, gY, gZ);

      // normalize the IMU data between 0 to 1 and store in the model's
      // input tensor
      tflInputTensor->data.f[samplesRead * 6 + 0] = (aX + 4.0) / 8.0;
      tflInputTensor->data.f[samplesRead * 6 + 1] = (aY + 4.0) / 8.0;
      tflInputTensor->data.f[samplesRead * 6 + 2] = (aZ + 4.0) / 8.0;
      tflInputTensor->data.f[samplesRead * 6 + 3] = (gX + 2000.0) / 4000.0;
      tflInputTensor->data.f[samplesRead * 6 + 4] = (gY + 2000.0) / 4000.0;
      tflInputTensor->data.f[samplesRead * 6 + 5] = (gZ + 2000.0) / 4000.0;

      samplesRead++;

      if (samplesRead == numSamples) {
        // Run inferencing
        TfLiteStatus invokeStatus = tflInterpreter->Invoke();
        if (invokeStatus != kTfLiteOk) {
          Serial.println("Invoke failed!");
          while (1);
          return;
        }

        int result;
        result = -1;
        // Loop through the output tensor values from the model
        for (int i = 0; i < NUM_GESTURES; i++) {
          Serial.print(GESTURES[i]);
          Serial.print(": ");
          Serial.print(tflOutputTensor->data.f[i], 6);
          Serial.print(" / ");
          if ( tflOutputTensor->data.f[i] > 0.95) {
            result = i;
          }
        }
        Serial.println();
        Serial.print(" Direction : ");
        if (result >= 0 ) {
          Serial.println(GESTURES[result]);

          digitalWrite(LEDG, LOW);  // Green for yes
          BT.XYsend( XDirection[result], YDirection[result]);   // Bluetooth send X Y
        }
        else {
          digitalWrite(LEDR, LOW);  // red for stop
          Serial.println("Stop");
          BT.XYsend( 0, 0); // Bluetooth send X Y
        }
      }
    }
  }
}
/* Self balancing Robot via Stepper Motor with microstepping and Digital Motion Processing
    written by : Rolf Kurth in 2019
    rolf.kurth@cron-consulting.de
*/

String inputString = "";         // a String to hold incoming data
bool   stringComplete = false;  // whether the string is complete
char   c = ' ';

/*
    SerialEvent occurs whenever a new data comes in the hardware serial RX. This
    routine is run between each time loop() runs, so using delay inside loop can
    delay response. Multiple bytes of data may be available.
*/
void serialEvent1() {
  while (Serial1.available()) {
    // get the new byte:
    char inChar = (char)Serial1.read();
    // add it to the inputString:
    if (!stringComplete) {
      inputString += inChar;
    }
    // if the incoming character is a newline, set a flag so the main loop can
    // do something about it:
    if (inChar == '\n') {
      stringComplete = true;
    }
  }
}

void BTRead( JStickData &JSData  ) {
  String       command;
  unsigned int j;
  long         value;


  // print the string when a newline arrives:
  if (stringComplete) {
    if (inputString.substring(0, 1) != "X")
    {
      Serial.print("Error reading Bluetooth ");
      Serial.println(inputString);
    } else {
      j = 0;
      for (unsigned int i = 0; i < inputString.length(); i++) {

        if (inputString.substring(i, i + 1) == "#") {
          command = inputString.substring(j, i);
          //Serial.print("Command: ");
          //Serial.print(command);
          j = i + 1;
          for (unsigned int i1 = j; i1 < inputString.length(); i1++) {
            if (inputString.substring(i1, i1 + 1) == "#") {
              value = inputString.substring(j, i1).toInt();
              //Serial.print(" Value: ");
              //Serial.println(value);
              i = i1;
              j = i + 1;
              assignValues(command, value, JSData);
              break;
            }
          }
        }
      }
    }
    inputString = "";
    stringComplete = false;
    // Serial.print(" Value: ");
    // Serial.println(JStick.Xvalue);
  }
}

void assignValues(String icommand, int ivalue, JStickData &Data  ) {

  if (icommand == "X")  Data.Xvalue  = ivalue;
  if (icommand == "Y")  Data.Yvalue  = ivalue;
  if (icommand == "B1") Data.JButton = ivalue;
  if (icommand == "Up") Data.Up      = ivalue;
  if (icommand == "Do") Data.Down    = ivalue;
  if (icommand == "Ri") Data.Right   = ivalue;
  if (icommand == "Le") Data.Left    = ivalue;

}